
We’re excited to announce that ConnectedVNC, our free VNC client plugin for DivX Connected set top boxes, is now open source and available on GitHub at https://github.com/mesmotronic/connected-vnc
Category Archives: ConnectedVNC
Posts relating to the ConnectedVNC plug-in for DivX Connected
ConnectedVNC adds audio!

The ConnectedVNC plug-in for DivX Connected now includes ConCast, so you can hear your PC too!
By installing a SHOUTcast or Icecast server alongside DivX Connected, you can now listen to your PC while using it remotely on your TV, enabling you to enjoy applications like Spotify and iTunes from the comfort of your sofa!
Existing users will need to download the latest plug-in to upgrade.
For more information about streaming audio from your PC to your set-top box, please refer to the the ConCast plug-in page.
Please note: audio is optional and some users may experience a 1-2 second audio lag.
Download ConnectedVNC from DivX Connected plug-in library
Take a look at the DivX Connected set-top box
ConnectedVNC 0.95 now available!
The latest release of ConnectedVNC adds additional remote control functionality:
- Tap ARROWS to move slowly
- Press and hold ARROWS to move fast
- Press DOT to pick-up (start drag)
- Press DOT again to drop (end drag)
While dragging, e.g. moving an icon or window, your mouse cursor will become semi-transparent to indicate that you are in drag mode.
Known issue: You should not try to drag the DivX Connected server window as the server may freeze.
Download ConnectedVNC from DivX Connected plug-in library
Take a look at the DivX Connected set-top box
Getting the most from ConnectedVNC

One of the biggest drawbacks of using your PC on your TV is that things that look great when you’re sat 30-40cm (12-16″) from your monitor, often look rather small when you’re sat several meters away on the sofa.
The quickest way to improve the situation is to change the screen resolution used by Windows to something more similar to your television to make everything larger and remove any black borders you may see around the picture. The best resolution will ultimately depend on the size of your TV, but we recommend trying:
- 800 x 600 for SD TVs
- 1280 x 720 for HD TVs (or 1366 x 768 if that’s not available)
To change the screen resolution in Windows XP, right-click anywhere on the Desktop to bring up the Display control panel and select Properties then the Settings tab. In Windows 7/Vista, right-click on the Desktop and select Screen resolution.
With the Display control panel still open, you will also have the opportunity to increase the size of the text and icons used by Windows. In Windows XP, select the Appearance tab and change the Font Size option at the bottom of the dialogue. In Windows 7/Vista, click “Make text and other items smaller or larger”.
If you are using ConnectedVNC to browse the web, zoom controls are available by selecting View > Zoom from the menu in Firefox, or by clicking on the magnifying glass in the bottom-right corner of Internet Explorer.
Download ConnectedVNC from DivX Connected plug-in library
Take a look at the DivX Connected set-top box
ConnectedVNC now available for DivX Connected
ConnectedVNC is a free VNC client that allows you to control your Windows PC from your television using your DivX Connected set-top-box.
What’s it for?
ConnectedVNC allows you use your PC from your TV, so you can do things like check your email and browse the web without having to leave the comfort of your arm chair.
Requirements
To use the ConnectedVNC plug-in, you need to install a VNC server on the same PC as the DivX Connected server software; we recommend UltraVNC.
Once installed, open Admin Properties by right-clicking on the system tray icon, create a password (middle-left), tick the box next to “Allow Loopback Connections” (top-left) and click OK.
That’s it! You’re ready to use ConnectedVNC.
Getting Started
To use ConnectedVNC, simply navigate to the Plug-ins menu, or press the orange button on your remote control, and select ConnectedVNC.
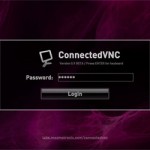
On the first screen, highlight the password box and press ENTER on your remote control to bring up the on-screen keyboard and enter your password, then navigate to DONE and press enter. Now, simply press down on your remote control to highlight the Login button and press ENTER.
If you have entered the correct password, the desktop of your PC should appear.
Remote Control
- ARROWS = Move the mouse up/down/left/right
- ENTER = Left mouse click
- MENU = Right mouse click
- PAGE UP/DOWN = Scroll up/down
- DELETE = Backspace key
- NUMBERS = Number keys (0-9)
For additional keyboard input, we recommend using Windows’ on-screen keyboard:
Error Messages
After you click the Login button, you might see a “Connection Error” or “Invalid Password” error; a connection error usually occurs because the VNC server is not running or is being blocked by a firewall.
Either way, simply press BACK to try again.
Download & Find Out More
- Download ConnectedVNC from DivX Connected plug-in library
- Take a look at the DivX Connected set-top box
ConnectedVNC contains code from the FVNC project.